
chevron_left
chevron_right
Contact us for back-order
Mastering The MikroTik Dude Installation and Configuration Workshop
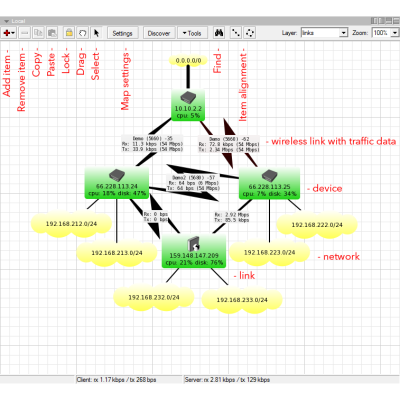
Welcome to the workshop on installing The Dude, a network monitoring tool from MikroTik. The Dude is free software, easy to install, and runs on various platforms. Today, we'll guide you through the installation process for both the client and server sides.

US/Canada
We only offer IC Certified products. For international products, contact us.
We only offer IC Certified products. For international products, contact us.
Please note!
Ship Charge Will Display As Free Until Ship Address / Location Is Provided To Calculate Ship Charge.
Ship Charge Will Display As Free Until Ship Address / Location Is Provided To Calculate Ship Charge.
Description
The MikroTik Dude Installation and Configuration Workshop
Overview
The Dude consists of two main components:
- Server: Manages data and performs monitoring tasks.
- Client: Provides the user interface for interacting with the server.
Downloading The Dude
- Access the MikroTik Website:
- Visit the MikroTik download page.
- Locate "The Dude" in the software section.
- Download the Files:
- Download the Server package NPK file for RouterOS.
- Download the Client installation executable for Windows.
System Requirements
Client Requirements:
- Runs on Windows XP or newer.
- Low resource requirements, suitable for low-spec computers.
- Can be used on Linux and MacOS with Wine or Darwine.
Server Requirements:
- RouterOS:
- Hardware support:
- TILE, ARM, ARM64, MMIPS devices.
- RouterOS x86 installations.
- RouterOS CHR environment.
- Note: Not supported on other hardware. For devices with 16MB storage, use external USB/microSD storage.
Installation Steps
Server Side Installation
- Upload and Install:
- Upload the .npk package to the RouterOS host.
- Reboot the host to complete the installation.
- Enable Server:
- Use the command
/dude set enabled=yesto enable the server. - Verify the status with
/dude print.
- Use the command
Client Side Installation
- Install the Client:
- Run the installation executable on your Windows machine.
- Follow the steps in the installation wizard.
First Use
- Connect to the Server:
- Launch the Dude client.
- Connect to the Dude server using the appropriate IP address and credentials.
- Configure Initial Settings:
- Import any existing databases if applicable.
- Begin adding and monitoring devices.
Database Import and Export
Overview:
- The Dude server supports database backups from current and older versions.
- Import/export commands may take time based on database size.
Summary
- Server Setup: Download and install the server package, enable it, and verify.
- Client Setup: Download and install the client application, connect to the server, and start configuring devices.
- Database Management: Use import/export commands for database backup and restoration.
Data sheet
MTK-FWCM-2024